I was unsure for quite a while what I would do. One thought I had was a thumb, but I lacked the methods to grant it even a partial range of motion. After a while though, the thought of making a nose randomly popped into my head. With few exceptions, the nose is largely overlooked as a part of the face. From there, it was a question of action. Maybe I could have it swell and shrink, but that would require possibly cloth or a material I lack the expertise in to make do as I wish. So instead, I decided the action to be the nose's most infamous action: sneezing. So, the challenge became making the nose able to expel fake mucus. The obvious substance to make the mucus would be green jello, but the thought of adding milk to make it more opaque and viscous seemed satisfactory.
Materials for this sculpture:
-metal wire
-plaster
-paint
-duct tape
-rubber tubing
-green jello
-milk
-ziploc bag
If all goes according to plan, the nose will expel the mucus when pressure is applied to the bag. Here's hoping. I suppose what I want to do with this sculpture is test the less beautiful side of the human body, namely its fluids. We generally want to have nothing to do with bodily fluids, not even our own. Making a sculpture of it will either disgust people or, in rare cases, give pause for thought.
Wednesday, April 21, 2010
Kidney plant
It took me some while to figure out what I wanted to do for body double. So I decided to play the piano and noticed a coffee cup that somebody in my dorm had left. I originally thought I was going to do a body double of an appendix, but I have no idea how I got to creating a body double of a kidney but I did. I've seen plants being grown out of cups, and I've always thought about the simplicity yet beauty of it. It seemed like a combination of an industrial society mixed with non industrial. So thinking about it, I thought it would be nice to create a project with a plant in it. Then the thought of having a kidney plant hit me. I thought it was somewhat clever with a comedic side to it. I took the coffee cup that was left on the piano and decided that I was going to fill the cup with soil and little pebbles. I wanted to create my own kidney plant with the use of real stems as well as duplicates made out of silver wire that would be wrapped around with green construction paper. The leaves would be the same too; real leaves and fake leaves that would too be made out of construction paper. Making the kidney was a little bit more difficult to figure out. I decided on using a stone or pebble to recreate a "kidney stone". Meanwhile the other side I would make a healthy kidney. I want to also specifically show the differences between the real objects and fake; the good and the bad. On the left everything will be healthy and on the left it represents this artificial plant that's dying. In my performance I'm going to water the plant with the use of my hands being cupped together. I want to show how precious life is and how easily damaged it can get.
Monday, April 19, 2010
FACE
I always liked drawing peoples faces, doing portraits, etc. Over the weekend I was able to get my hands on a block of clay and I sculpted a a head. It came out a lot better than I expected, since I usually rarely work with clay and also because I'm not a sculptor in general. But it actually renewed my interest in sculpting.
So my idea is a PEZ dispenser using my clay head. Using cardboard, plastic, acrylics, spraypaint, I want to make a PEZ dispenser for my body double. Ill have to research how a PEZ dispenser works.
For the candy I'll probably use regular materials like clay and they will represent emotions.
Eyeball double
I'm making an eyeball because sight is one of the most important things to me. Without eyes, I can't enjoy or make art. Neither can I read easily, or write. The world would become difficult to navigate.
I want to make the eye out of mostly transparent materials because everyone can see most of the outside of an eye all the time. This way I can emphasize that the inside and outside of the eye are equally important to its function. I am more interested in representing most of the important parts than creating a "realistic" representation.
Materials:
spherical glass for outer part
lens-shaped glass piece for pupil (sold in bags of 30).
clear mancala piece for inner lens.
gold coated aluminum wire for nerves.
glue or gelatin for vitreous humor
glue (tinted white) may be used to color outer layer.
I found all these at michaels or in my house.
I want the nerves to stand out- to point out that there is no image without the connection to the brain. So I also hope to use the wire coming out the back to form the base.
Kidney Picture Frame :)
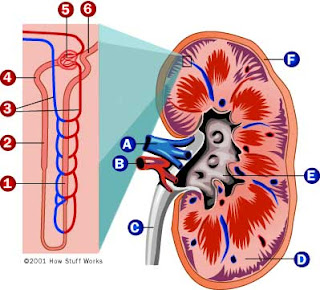
I have run through hundreds of ideas for this project some amazing some not so good but all were mostly adventurous. I bought many different kinds of materials and tested them to see if they would work for what I want to achieve and ran into some difficulties (lets just say it involved spray insulation foam which is an awesome material but if you get it on your skin it wont come off without a fight!) So I decided to just sit down with a pencil and paper and write down different body parts that had significance to me and how I could represent that significance in my sculpture. I had just gotten off the phone with my Dad when it hit me...I will do a kidney! My father was diagnosed with renal cell carcinoma (kidney cancer) last summer when they found a softball sized tumor in his kidney. The findings were completely unexpected as he was at the time a healthy 46 year old man just getting a CT scan ordered by his doctor in a typical physical. He had his kidney removed within a few months and is cancer-free today but I never will forget those months of anguish and fear that he might be taken by cancer at such a young age. My father is a motivating force in my life and I cant imagine what my life would be like without him.

PROCESS:

So I am going to make a kidney but when searching through photos of kidneys I discovered the hidden beauty that lies within the cross-section (as if you cut the kidney in half exposing what is inside.) I wanted to incorporate my father somehow and I think I am going to also make the kidney a picture frame and place a photo of my father inside of it. So when you look at the sculpture initally it looks like an anatomical model and when turned around it is a picture frame....
Materials:
Clay (air dry)
knife : to shape clay
Plastic Tubing
Red/Salmon/Royal Blue/ Eggplant/ Black/ White acrylic paints
Paint brushes (various sizes)
Medium sized picture frame (perhaps plain vs. ornate..)
Photo of my father
blankets: to cover ground to prevent mess!
I am not 100% certain of the finishing details..since it is a picture frame I was thinking of making it more decorated with the use of colored beads that I could use in certain parts of the kidney... I am inspired by Liza Lou's work with beads and would love to emulate that somehow in this piece!
Liza Lou's beaded kitchen:

PROCESS:
I hope to use the existing picture frame as my base and then use clay to build off of it to create my kidney shape. Then I will make a flat surface (on the non-photo side) and use smaller bits of clay to create a realistic texture. I will then paint the entire thing using acrylic paints and add some beaded details to the finished product...
Wish me luck!
P.S
Liza Lou has some work with the body as well... it is pretty amazing.. Google it!

Body Double, Lungs
For my project I am going to replicate a set of lungs. As I was thinking about what body part I was going to do, the lungs immediately came to mind. Without them, you die. This could be said about many other parts of the body as well, but the lungs seem so prominent to me since we can feel ourselves breathing, and even if we try to, we can't stop for more than a minute or two.
The materials I am going to use are:
-chain link (if I can find it?)
-tissue paper (preferably pink)
-saran wrap
-pipe cleaners
-tape
-wire
-paper clips
-some kind of small battery operated lights (anyone have suggestions on where to get these?)
I thought about doing something where my lungs would breathe, but I just saw Matt's post, so I'm going to leave that to him. Instead, my lungs are going light up and hang from the ceiling; a chandelier of sorts. I want it to be at least somewhat pink, because living lungs are a pinkish color, whereas unliving ones turn grey. I'm a little worried about using lights in the lungs, because I'm not sure where I'm going to get them, and I'm not sure if they'll be bright enough to shine through the other materials. But I hope so :)
Organs
For my project, I will be creating a small mold of a body. The body will have spaces carved out to place some of the body’s organs. The organs I chose to represent are the brain, the lungs, the heart, the liver, the stomach, and the kidneys. The mold will be made out of moldable plaster. The organs will be made out of water balloons filled with sand. I am also thinking about writing the name of the organs in the spaces left for them.

My original plan was to represent the abdominal muscles. I wanted to fill a balloon with sand to create something similar to a stress-relieving ball. However, as I tested this plan, I came to realize that it was not possible to fill the balloon with enough sand. I toyed with many different possibilities for my one tiny sand balloon.

I eventually decided that want my piece to reflect my childlike personality. By using balloons, sand, a play-doh like mold, and alluding to the board game Operation, I am sharing some memorable elements of my childhood.
Materials:
Moldable Paste (Bought)
Sand (Found)
Balloons (Bought)
Balloon Filler Funnel (Bought)
Sharpies (In My Possession)
The body mold will be white. The balloons are all different colors, except where there are two of the same organ (lungs, kidneys).
My original plan was to represent the abdominal muscles. I wanted to fill a balloon with sand to create something similar to a stress-relieving ball. However, as I tested this plan, I came to realize that it was not possible to fill the balloon with enough sand. I toyed with many different possibilities for my one tiny sand balloon.
I eventually decided that want my piece to reflect my childlike personality. By using balloons, sand, a play-doh like mold, and alluding to the board game Operation, I am sharing some memorable elements of my childhood.
Materials:
Moldable Paste (Bought)
Sand (Found)
Balloons (Bought)
Balloon Filler Funnel (Bought)
Sharpies (In My Possession)
The body mold will be white. The balloons are all different colors, except where there are two of the same organ (lungs, kidneys).
Umbrella Skeleton Foot
For my project I decided to make a foot. I was inspired by the anatomical pictures we saw in class and while I was thinking about objects in my room I saw my old umbrella, and that's what made me decide to make a foot. I cut off the waterproof fabric from the umbrella and I was left with the metal skeleton, which reminded me of spindly spider-like things, phalanges and skeletal structure in the foot. An example can be seen in this picture:

While I was opening and closing the umbrella it reminded me a lot of toe curling or other foot movements like everyday walking and activities like dancing, where people can point and flex their feet. I'm only making one because I didn't want to destroy my good umbrella.
 (** not my umbrella!**)
For this assignment, the inspiration mostly came from the materials I already had lying around. I've decided that I don't want to make it realistic but rather take a technological or maybe robotic like approach, and leave it in its cold metallic state, like bare bones. I sort of want to make it seem uncomfortable (which I might show when I demonstrate in class, so I won't discuss it here). I'm going to a hardware store tomorrow to see what I can use as a base as well as what other materials I can add on to it to keep it feeling the way I want it to.
Materials:
- only the skeleton of an umbrella, so far.
While I was opening and closing the umbrella it reminded me a lot of toe curling or other foot movements like everyday walking and activities like dancing, where people can point and flex their feet. I'm only making one because I didn't want to destroy my good umbrella.
For this assignment, the inspiration mostly came from the materials I already had lying around. I've decided that I don't want to make it realistic but rather take a technological or maybe robotic like approach, and leave it in its cold metallic state, like bare bones. I sort of want to make it seem uncomfortable (which I might show when I demonstrate in class, so I won't discuss it here). I'm going to a hardware store tomorrow to see what I can use as a base as well as what other materials I can add on to it to keep it feeling the way I want it to.
Materials:
- only the skeleton of an umbrella, so far.
Ribcage with Spine Attached

When assigned this project, I immediately thought of making a ribcage attached with the spine. I was talking to Matt about it just jokingly, but I thought i'd be a great idea. I understand that two other people are doing the ribcage, and a few others doing the spine, but I think it should be fine, because art is always being portrayed differently with each artist. Reproduction right?
I wanted to emphasize a lot on detail, making my ribcage as realistic as possible. It'll be difficult considering the materials that I intend to use, but hopefully the creativity will makeup for the detail.
Materials:
1) CD/DVD Stack Holder as a base and support
2) CD's
3) Flexible wire
4) Chains
5) Soda Cans (cut the aluminum to make it look more sturdy (ribcage))
6) Paint
7) Aluminum foil around the wiring of the ribs
These materials will be both found and a few bought.
I'm not quite sure about what the second use of my sculpture will be but I was thinking something along the lines of a CD holder or a sculpture used for storage/stacking materials. It'll be supported by the CD holder base.
Colon, not ":"
I think I am going to make a colon out of cloth, sort of like a stuffed animal, to be used like a pin cushion. The pins will be stuck in and cluster together representing a cancer. My family has a history of colon cancer which killed two of my aunt's, one of which was living with us as we were taking care of her. It is a constant possible threat of possibly getting some form of cancer from my dad's side of family (history of leukemia, too). I already am starting to show signs of a hereditary condition on my dad's side where the hands shake uncontrollably and it just reminds me of all the worse things that could possibly be coming my way.
So... enough depressing worrying shit. To the Material List!
I will need:
-cloth
-thread
-pins
-stuffing to stuff inside
-needles (already own)
Might need some other stuff, but I'm pretty sure that will be all I need.
See everyone in class! ^_^
So... enough depressing worrying shit. To the Material List!
I will need:
-cloth
-thread
-pins
-stuffing to stuff inside
-needles (already own)
Might need some other stuff, but I'm pretty sure that will be all I need.
See everyone in class! ^_^
Sunday, April 18, 2010
My Left Foot (Or Right IDC)
For this project I will be recreating a foot. I felt that they are important to our everyday lives. Without them it would be difficult to get around. First off, I have danced for around 10 years. I started tap dancing when I was like seven and stopped once I hit college. I always found it fun and interesting to do. Plus, people don't expect someone like me to have taken formal dance training in their lives. Second, I have taken karate for a good portion of my life. With out feet, kicking and just standing to fight would be fairly difficult. It always felt good when my foot connected with someone's chest during a match.
The materials I am going to use are pretty much, actually, just duct tape. I see a lot of people creating things out of duct tape, so I thought why not try it out. I am balling up many smaller roles of tape to give it substance. Then use strips of tape around the roles to create the shape.
Materials:
Duct Tape
A stick(maybe)
Tummy pillow!
For my body double, I'm going to recreate my tummy...as a pillow. I was inspired by a few things:
First off, when my friends and I used to cuddle and stuff I was always told I was a good tummy pillow, which always made me smile.
Second, I'm very much into the fashion scene, and the tummy is one of the main body parts for models that judges look at and critique. Models always have to be super skinny, with tiny waists and sculpted abs. I don't like this kind of critical thinking, and making a tummy pillow would challenge it. Also, the tummy is a very sensitive part of the body, and what better way to invoke soft and ticklish than a pillow?
Lastly, I love sewing, and recently read an article that talked about how sewing, knitting, and crocheting objects has become more and more prevalent, and now there are a lot of things considered as "soft sculptures". I would really like to pursue in my future work.
The materials I would need for this project are:
-flesh-colored fabric
-fabric paint
-pillow stuffing
-sewing materials etc etc
Basically, the way I would make this would be to measure my tummy around (bottom of ribs, waist, and hips), and then make a sewing pattern shaped like my tummy. I'm hoping that I'll really get to express all the curves and such. Then I would cut out the fabric, sew the seams together, stuff it and sew it closed. Lastly I plan on using fabric paint to add things like shadows and a bellybutton, to make the tummy pillow realistic.
I'm very excited to make this project!
The Heart of Life is in Breathing


Why:
For my body double project I want to examine the lungs. My lungs are important to me for many obvious and not so apparent reasons. First of all it allows us to breathe, inhaling oxygen and exhaling carbon dioxide, and survive. Second, as a child my asthma was pretty severe and hindered me in participating in many extracurricular activities. Though I was able to overcome most of its drawbacks and participate it always lingered in the back of a my mind as a potential killer. My strength depended on my lungs and has always been my main focus as an athlete in any sport I competed in. Third, I have voluntarily chosen not to smoke anything that can further damage or restrict my lungs. My parents smoke and being around that and asthma running in the family does not make the situation any easier. I plan on creating an installation which is interactive as well as a learning tool. I want to illustrate good lungs versus corrupt ones.
How:
In order to do this I was thinking of using plastic bags or balloons and shaping them as lungs. Coating them to look like lungs would be a plus. I might create the chest cavity as well. I would connect the "lungs" to a tube which a viewer could breathe into and the lungs would mimic the users lungs in breathing. I was considering to create two sets of lungs one which was healthy and one which was damaged illustrating the difficulty of breathing between each. The reproduction would be imitated in the action and the objects themselves. It would be cool if one could wear it as well like an chest plate showing the insides of ones workings.
What:
not final but a general idea: (suggestions?)
plastic bags/ balloons
tubes/ piping
a box
frame
paint
straps
…….
Where:
I would get the materials from findings in my house, Michaels, or Home Depot. Michaels would be for general art supplies, Home Depot I have have used for plastic tubes and pipes, home is hopefully for general supplies to save money.
When:
I hope to complete gathering materials and figure out a working design by Wednesday. I will make my blue prints tonight Sunday April 18 and have the whole project done by the deadline which is when our Art Stu 9B gallery opens!
Who:
I will being working on this project by myself with some suggestions and comments by my fellow classmates. If it becomes a chest example I will perform it myself.
Any ideas? Suggestions? Comments? Please anything would help.
Matthew Arambulo
My Project- Neuron
For my project I will be reconstructing a single motor neuron and its responding effector muscle. I have decided to do my project on the neuron due to its interesting and essential aspect on all life processes. Neurons and their activities are the foundation for all living activity. Neurons process and transmit information by electrical and chemical signaling. Neurons are able to do this by connecting to each other in order to form networks. My project will specifically focus on one motor neuron transmitting an action potential (electrical signal) to an effector muscle fiber that results in muscle contraction. I found this particular part of the body very interesting because of the transmission of information to and from the brain is essential in all living organisms.
My neuron model will consist of an axon covered by a myelin sheath, the cell body or soma, the dendrites, and the muscle cell undergoing contraction. My model will demonstrate the action potential moving from the cell body, down the axon to the dendrites, and transmission to the muscle cell. The myelin sheath will be made out of colored plastic wrap bundled in groups around a thick nylon tubing. The nylon tubing will have lights running through the inside which will act as the action potential traveling down the neuron and will attach to the effector muscle fiber which will be made from a metal spring. The body will be designed and sewn together with a thick cloth-like material which will be wired to take shape of an actual soma (body). The nucleus is still in the process of being created.
Materials:
3 ft thick nylon tubing
8 ft thin plastic tubing
galvanized steel wire
string of lights
electrical wiring
plastic wrap
several different cloths
acrylic paint
glue
Dirty Abs
I want to create a body double of an abdomen, from the bottom of the rib cage to a few inches past the navel. Using a large water container, I'm going to cover it with paper mache and form it into the shape of an abdomen, then fill the hollow center with mud. I'm going to put something inside the mud (maybe a rock? but I'm still not sure) and then my action with the piece will be putting my arm into the mud and taking the rock out. I am hoping for it to be really messy. :)
The idea I want to get across to my viewers is the complexity of the individual, how essentially going through a lot of tough times with someone brings you both closer together. You really learn about others' personalities, quirks, and more hidden aspects of their character. Through my action, I am making literal this idea of getting closer by "growing through shit" and digging through mud to find something unique and hidden inside the body double.
MATERIALS:
[ X ] Plastic Water Container (1 gallon)
[ X ] Flour (for paper mache)
[ X ] Water (for paper mache and mud)
[ X ] Newspaper (for paper mache)
[ X ] Paper Towels? (for paper mache, to give a more fleshy look)
[ ] Paint
[ X ] Dirt
[ ] Box (for the base)
[ ] Rock?
body double of an abdomen, from the bottom of the rib cage to a few inches past the navel. Using a large water container, I'm going to cover it with paper mache and form it into the shape of an abdomen, then fill the hollow center with mud. I'm going to put something inside the mud (maybe a rock? but I'm still not sure) and then my action with the piece will be putting my arm into the mud and taking the rock out. I am hoping for it to be really messy. :)The idea I want to get across to my viewers is the complexity of the individual, how essentially going through a lot of tough times with someone brings you both closer together. You really learn about others' personalities, quirks, and more hidden aspects of their character. Through my action, I am making literal this idea of getting closer by "growing through shit" and digging through mud to find something unique and hidden inside the body double.
MATERIALS:
[ X ] Plastic Water Container (1 gallon)
[ X ] Flour (for paper mache)
[ X ] Water (for paper mache and mud)
[ X ] Newspaper (for paper mache)
[ X ] Paper Towels? (for paper mache, to give a more fleshy look)
[ ] Paint
[ X ] Dirt
[ ] Box (for the base)
[ ] Rock?
Feet of plaster
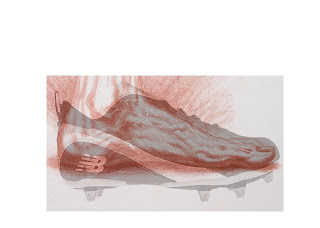
For this project I decided to make a double of my own right foot. I think the foot is a really interesting part of the human body. People do not really think about feet all that much unless they sprain their ankle or break some part of it. By creating a body-double of it I wanted to emphasize its function in some way or another. What I finally decided to emphasize was the stability and balance we have when we stand up, as if our feet were sticked to the ground. The idea came from the cleats that I saw at a soccer game. I was interested in how they adhere to the grass not to slip when running and I decided to try and see how I could insert it in the human body. A sort of fusion between the feet and the shoe.
I will use play doh to make a mold out of my own foot that I will bake in the oven to make it hard. The actual foot will be made out of plaster and painted with foundation to make it look real. I decided to use plaster because it was the most efficient material but also because of the expression "feet of clay". While that expression means instability, fragility and flaws I found ironic to use plaster as an antithesis of the expression, meaning exaclty the opposite,
which works with the suction cups I want to add at the bottom of the foot to reall stick it in the ground. I decided to create this part of the human body because when we were talking about molds in class I though it would be interesting to try to mold toes and I extended to the whole foot from there.
Materials:
- play doh
- plaster
- suction cups (plastic). Although I do not know where I could get those yet.
- foundation
- fake nails
- scissors
- drill
-Elena.
The Foot!
For my project, I will be reconstructing the left foot (up to the ankle) out of modeling clay. Before it dries, I will cut different sized squares, about half an inch deep, into various sections of the foot. Then, using cardboard, wooden skewers and thumbtacks, I will make door flaps, with hinges and handles, attached together with craft glue. These will then open to reveal the inner workings of the foot, suchFor my project, I will be reconstructing the left foot (up to the ankle) out of modeling clay. Before it dries, I will cut different sized squares, about half an inch deep, into various sections of the foot. Then, using cardboard, wooden skewers and thumbtacks, I will make door flaps, with hinges and handles, attached together with craft glue. These will then open to reveal the inner workings of the foot, such as nerves, veins, muscles, etc. With red and blue acrylic paint, I would like to paint over the actual insides, to contrast with the blank, white outside.
I want to convey the idea of science combined with art, reflective of the functional drawings of body parts in medical books. In this way, I want to bring beauty to the unexpected. I chose to do the foot because I feel it is not given enough credit for all it does. Feet have always been seen as disgusting, smelly, sweaty, so contrast this preconditioned belief, I’d like to show how something perceived to be ugly can in fact be beautiful. And by being able to “open” parts of the foot, exposing the delicate veins and nerves, I want to reveal the “inner” beauty to one of the must-hated body parts.
Materials:
Modeling Clay
Wooden Skewers
Cardboard
Acrylic Paint
Glue
Thumbtacks
dentures for Toothless...
...did anyone see 'how to train your dragon'? :)
although they probably will not be fit for a dragon, i am planning on reproducing the gums and teeth (essentially, extra large dentures?) for the body double assignment. i was initially drawn to using teeth because they are an alternative way of identifying a body after death- if the individual has become unidentifiable through the typical means. within our class most of us have probably been to the dentist and had x-rays taken of our teeth and therefore also have records of this unique form of identification. in any case, i plan on using food items to complete this project because i like working with food on thematic and conceptual level in my work. i plan to make the gums out of trident's 'pink bubblegum' - chewing it so that its is malleable and then for the teeth, i am thinking about using garlic cloves, but building them up so that they are size appropriate. another thought is to use corn kernels for the teeth - such as the kernels for popcorn. but! the kernels were a lot more 'rounded' instead of 'square' -not exactly the aesthetic i was going for so i am in the process of drying corn on the cob out to use 'square kernels' (dehydrating the corn is a lot harder than i thought it was going to be though). after moulding the gum into the shape/form of the gums, i plan to press the 'teeth' into the gum and then freeze it so that the gum holds it shape (at least until class i hope!)
i plan to use:
+ trident chewing gum
+ mouths to chew the gum
+ garlic cloves
+ hot glue gun or krazy glue (just in case)
+freezer
++supplies were purchased from target/ralphs or things i already have
any suggestions would be great, thanks! especially on how to make sure the gum keeps it's shape... maybe let it dry out? freeze it? paint it?
- janice m
Fear Itself

The Amygdala is located in the center of the brain and plays the key part in the reactions of unpleasant things and experiencing emotions, like fear. I've always been inspired by deep emotions and how we control it, so I thought this would be something I would be into. The actual amygdala is a set of almond shaped mass of nuclei located above the hypothalamus.
When I saw photos of the amygdala, they were attached to the hippocampus, which controls memory, especially long-term memory. In order for me to construct the amygdala, I have to include the hippocampus. Luckily, both parts compliment each other in the action I will do.
The action is pretty simple, but the most obvious conclusion I can think of is to use the set of amygdala and hippocampus as a picture frame and frame a photo onto the sculpture. We essentially use photographs to take place of memories and I thought the amygdala and hippocampus is a perfect pair in creating a photo frame of emotions.
I wanted to recreate this pair in a whimsical sense and I was inspired by the artist, whom I forgot the name, that used string and yarn. The amygdala controls many functions in the brain, ranging from emotion, arousal, and the sense of unpleasant things. I will focus the actual sculpture on the emotion of fear and depression, so the overall color scheme of the yarn will be somber colors, encompassed around a styrofoam ball. The hippocampus will be formed by a mass of thin wire, stuck from the styrofoam ball and bent to create the outline. I will then stick cotton around the wire to bring out a dream like effect.
Materials:
yarn in dark colors- black, grey, muted yellow
styrofoam balls
wire
cotton
fabric glue
scissors
measuring tape
a photograph
-I have most of the materials, but a quick trip to Joann's Fabrics & Michaels will be needed.
Any suggestions/comments are appreciated!
-Charlene
Iron-Man


For my project I will recreate the ribcage. Using chicken wire and duct tape I will attempt to reproduce the area between the collar bone and the end of the ribs. I drew inspiration from the highly anticipated upcoming movie, IRONMAN 2. Ironman is a normal human being dressed in a nearly indestructible armor which provides him with weaponry and, most importantly, protection. As I meditated on the thought of body protection, basketball star Dwight Howard and Superman came to mind. Dwight Howard is known for his powerful body and the under-armor he wears during basketball games. Superman is just Superman. The ribcage seemed like the perfect body part when thinking "body-guard". The ribs are the ultimate protection yet under-appreciated. It protects every vital organ and can withstand immense amounts of force. Without the ribs, we could die by simply falling off a bike. My reproduction will function as armor for the chest area with an extra little summin' summin' to make it look cool.
MATERIALS:
- chicken wire
- duct tape
- cutting tools/pliers
- gloves
- band-aids (for when if the gloves don't protect my hands)
All of the above are objects that I already had rotting in my garage. I have already planned out how I will go about making the piece and will begin the actual creation process soon.
- Rob
Cut-throat Mother


For the body double assignment, I have chosen to recreate the breast and abdominal section of a pregnant mother. With this mid section, I will add spider-like legs to the sides. The original idea was inspired by black widows and their odd maternal instincts. I then realized that a pregnant mothers abdomen looks almost exactly like a black widow. The black widow is an example of a mother because she tends to eat the male spider after they mate. She is a cruel and harsh example of a "cut-throat mother." I had difficulty adding a function to this body double. I have decided now that the abdomen will be hollow and I will create a baby to place inside it. Audiences will be able to interact with this body double by removing the baby. Another idea I developed was to create the abdomen out of fabric. I would then add a zipper onto the stomach area so people will be able to unzip the abdomen. After much consideration, I realized that sewing would be a difficult task for me to accomplish and chose to use plaster paper over a wire frame.
Materials List:
1. Plaster paper
2. Metal Wiring
3. Acrylic Paint
4. Duct Tape
Kidneys to Bladder
For my project I have decided to recreate the kidney,ureters and bladder. Originally I was thinking about recreating the nervous system but considering the time frame and numerous nerves I decided something less complex might be a better idea. One of the kidneys main functions is filtration, which among other things leads to the creation of urine. The urine is funneled down the ureters into the bladder where is stored until being released. I want it to hang from the ceiling, ( and if possible be able to pour water into the kidneys.. though this has been a challenge so far to figure out) I was thinking that it could possibly be used for a fountain? or watering can? Wind chime? Eccentric bathroom decor...?
Materials:
2 half moon shaped small plastic pipes ( structural shape of kidney)
coconut material - for cushioning around pipes
electric tape- (secure coconut material onto pipes)
26g wire - ( wrap around kidneys and extend to ceiling for hanging)
wire cutters
2 face masks ( sewn together to create the bladder)
needle and thread
saran wrap ( to line the bladder, assuming it may hold water - though unsure if this is going to work)
paper towels - (wrap around "bladder")
duct tape - (secure paper towels)
small tubing (for ureters)
water balloons - ( still unsure if I am going to use these... if anyone would like a ton of water balloons I will gladly give them away)
plastic water balloon filler (conveniently came with water balloons)
plastic hanger - (to hang it my creation)
dark red spray paint ( kidneys)
light pink paint (ureters)
darker pink paint (bladder)
paint brush
Places where materials have been acquired:
Joannes Fabric store, Home depot, Lowes, Micheals, Ralphs
I have started creating it already and so far its going pretty well. My kidneys are a little too large to be considered life size for the average adult... maybe they can be considered sumo wrestler kidneys. Anyone looking for cheap paint for their projects should checkout Lowes - they have a used paint section which is very very cheap. 50 cents - 2 dollars, its a really good find - assuming they have the right color. Also something I have discovered is spray paint stays tacky for quite some time, I didn't know that... glad I started early.
Materials:
2 half moon shaped small plastic pipes ( structural shape of kidney)
coconut material - for cushioning around pipes
electric tape- (secure coconut material onto pipes)
26g wire - ( wrap around kidneys and extend to ceiling for hanging)
wire cutters
2 face masks ( sewn together to create the bladder)
needle and thread
saran wrap ( to line the bladder, assuming it may hold water - though unsure if this is going to work)
paper towels - (wrap around "bladder")
duct tape - (secure paper towels)
small tubing (for ureters)
water balloons - ( still unsure if I am going to use these... if anyone would like a ton of water balloons I will gladly give them away)
plastic water balloon filler (conveniently came with water balloons)
plastic hanger - (to hang it my creation)
dark red spray paint ( kidneys)
newspapers - in an effort not to spray paint my porch
light pink paint (ureters)
darker pink paint (bladder)
paint brush
Places where materials have been acquired:
Joannes Fabric store, Home depot, Lowes, Micheals, Ralphs
I have started creating it already and so far its going pretty well. My kidneys are a little too large to be considered life size for the average adult... maybe they can be considered sumo wrestler kidneys. Anyone looking for cheap paint for their projects should checkout Lowes - they have a used paint section which is very very cheap. 50 cents - 2 dollars, its a really good find - assuming they have the right color. Also something I have discovered is spray paint stays tacky for quite some time, I didn't know that... glad I started early.
Saturday, April 17, 2010
Throat
For my project, I've decided to duplicate the human throat, from the chin down to almost the collar bone. I would like to make this reproduction out of a hard plaster then cut down the middle of the throat and expose the larynx and all the fragile tissue inside. All of the "insides" would be made of either fabric or foam, or a combination of the two. I originally wanted to make the reproduction out of metal to show how incredibly tough our skin is then have the cut show that our skin, though tough, must still be protected. But since I've never worked with metal, it seemed too ambitious in the time frame given, so instead I plan to spray paint the plaster mold in a dull silver.
The reason for picking this body part is because I feel that the skin itself is an incredible organ. It is durable, resilient, waterproof and it protects all of our fragile organs. Yet, take one sharp knife and you can slice open any part of your body and expose all of that fragility. To express this, I plan to insert (hopefully) a working zipper along the cut of the throat.
Materials I will need:
-Plaster or some sort of molding material
-metal zipper
-X-acto knife
-fabric
-foam
-rubber cement
-spray paint
Book of Knowledge
For my project I have decided to use the brain as my reproduced body part. I am currently taking a biology class on brain dysfunctions and through this class I have learned that it is extremely easy to have complications within the brain. I feel that many people take for granted how extremely complex the brain is and the millions of functions that the brain completes in order for the body to perform even the simplest task, every day! In addition, the brain is like a sponge that is constantly absorbing new information because it is the main control center for storing and learning knowledge. One of the main reasons for choosing this specific part of the body is that my grandfather (who was an artist in many medias) had Alzheimer/ Dementia. This is a non-diagnosable disease that deteriorates your brain and results in a loss of all bodily functions. This loss includes speaking, memory, behavior, language, which leads to the end result of fatality. Therefore, I will be dedicating my sculpture to my grandfather because he has passed on to me not only knowledge, but has inspired me to become an artist and live on the path I currently am on at UCI.
For my project, the materials I need are:
-Styrofoam ball
-clay (2 packs)
-watercolors
-paint brushes
-varnish/gesso
-razor
-cardboard
-a really big book
I will be able to find all these materials around my house or at Michaels.
I want my project to look like an ordinary book from a distance, but when you open the book; all the pages will be cut out. Inside the rectangular cut outs of each page, which should form an empty space in the book, I will insert a brain. The brain will be sculpted from Styrofoam and clay, and painted with water colors to create a more realistic color scheme. In addition, I will be covering it with a varnish or gesso material so that the brain appears wet, like it was just pulled out of someone's head.
Eyeball Body Double
 I'm thinking of making the eyeball with the use of flashlight. I picked the eyeball because as a visual artist, I feel like my eyes are the most important part of my body. The eye has fascinated me ever since I found out how to draw them and it interests me how every eye documents every person's life in so many different ways. So I have decided to make the eye be "enlightened" with the use of the flashlight.
The eyeball will be formed by a plaster, and I'm hoping it will turn out hollow by the use of a rounded newspaper. It will then be attached on top of a flashlight, so when it turns on the light will be shown through the plaster (I'm thinking of having this as my action, but I am not sure if this is enough to be called an action). I do not want the form of the flashlight to be exposed, I want to surround the body of the flashlight with video chords/wires to represent the nerve fibers. I want to incorporate the color of the irish, but I am not sure how I want to do that because I am still researching of the origin of the color. If anyone has any idea how the color of the iris is reflected onto the eyeball, I would love to know so I can incorporate it in my work :) I was also thinking of the use of a small glass to represent the lens inside the eyeball.
So far I'm thinking of having a wooden/cardboard base to support my eyeball, and the size will possibly the size of my forearm like suggested.
Any suggestions would be helpful! :)
Materials:
Plaster
Newspaper
Flashlight
Chords/wires
Paint
Hot glue/tape
glass
Cardboard/wooden board
I pretty much have everything in place, and all I have to do is to create the piece.
Natsumi Shiraiwa
Primative Pelvic Cavity; Pelvis, Coccyx and a tail

I am going to recreate the pelvis and the coccyx (the tailbone). At the end of the tailbone, I'm going to make an actual tail. Why? Because back in the day... wayyyyy back in the day, humans had tails, but as we evolved, the tail turned into what is now the tailbone.
I chose the pelvis because this structure is actually differentiated between men and women, where women hips are much wider than men. Archeologists have been able to analyze ancient bones this way.
I also chose the tailbone (with the addition of the tail) because I believe in evolution and this sort of shows a relation between humans and apes.
I plan on recreating this with Sculpy, the clay that can be oven baked. If it does manage to fall apart, however, I'll have superglue and plaster gauze. Or, perhaps I will just try to structure the cavity with newspaper and wrap it with the plaster gauze itself. I will attach it to a hanger, allowing it to swing. Just to give it a touch of humor, I'm going to dress it up in a nice pair of panties. I am hoping to find a stand where I could hang the hanger on.
I am hoping that the final product would actually look like the picture above... with a tail. I am still looking for suggestions so please help me out! Be harsh if you will... :)
Materials:
Sculpy
Plaster
Hanger
Stand
Precision tools
Glue
Pipe cleaners or yarn for the tail
Acrylic paint (clear coat?)
Wire
Newspaper
Sand paper
Underwear (undecided if I will make it or purchase it)
Michael's & Target
Wish me luck!!!
Friday, April 16, 2010
Neuron Psychologist
For the body double project, I plan to reproduce a neuron. Neurons serve key roles in transferring and processing sensory, motor, and cognitive information. In other words, neurons are responsible for our senses, movements and thoughts. For the piece, the neuron will be displayed vertically. The axon will be glued to a wooden base while the nucleus and dendrites will be at the sculpture’s top. The neuron will be enlarges to the size of a forearm and possibly constructed out of paper mache.

Conceptually, I would like to emphasize the transmission of data in my project through the help of the neuron’s branch-like structure. However, rather than relaying information to another neuron, the neuron will directly communicate with the participating individual. The neuron’s objective will be to read the individual’s mental state with the help of a thermochromic liquid crystal (fancy term for mood ring), whose color code may be deciphered through the hanging, colored objects that will present helpful suggestions for the individual.
Materials (* = do not have yet)
Mood Ring* (Claire’s… anyone have any other ideas where I might find these?)
Wire
Wood
Paper
Beads
Paint/ Spray Can
Hot Glue
Glue
Tape
Scissors
Sorry if the post sounds complicated. It is actually quite simple =).
~ Alicja Chrena
Thursday, April 15, 2010
Pets
 Honestly, I do not recall ever seeing a child so happy to be on a leash (like the one in the photo).
And so, from this, I draw my inspiration.
I plan to mold the body double after the human neck. From Madonna with the Long Neck of the 1500s to high fashion models of today, people have considered the neck as something that, potentially, signifies beauty. However, to me, the neck first elicits images of fragility, the guillotine, and suffocation (Yes, I do realize that the child leash does not actually go around a child's neck, but that is simply what comes to mind). I hope to incorporate both beautiful and ugly connotations in this sculpture.
In order to distinguish the neck as such a body part, as opposed to an abstract cylinder, I also plan on creating the lower section of the head as well as part of the shoulders.As for materials, I will attempt to use homemade papier mache (i.e.: flour and water, newspaper, maybe wire?) as the main medium, since those are the few, simple items that I already have available in my humble dorm. If that fails, then a dash to Michael's will surely remedy that. I would then spray paint it orange (partly because it is the only color I have at the moment and partly because it reminds me of fake tans). I also plan to use a ribbon as a "leash," with which I would drag around the body double (movement!). Ideally, I would also place something heavy, like a book, around the shoulders area of my sculpture, so that there would be more resistance while dragging. A cardboard base would make it easier for the sculpture to slide around the ground.
 To summarize, a simple collection of google'd images.
 ribcage
For my project I plan on recreating my ribcage:
People often overlook the importance of the ribcage and how it protects our most important internal organs. It forms a core part of the human skeleton and consists of twenty four ribs . Without the ribcage, your internal organs would be subject to injury quite easily and could potentially result in fatality. Not only is the ribcage of great importance, but from an artistic view iI find it's shape and structure beautiful.
Materials that I will use:
1. white plastic trash can
2. wire
3. tape
4. plaster
5. glue
5. acrylic paint
6. wood
7. scissors
8. exacto-knife
9. wire cutter
10. small sponges
11. paint brushes
12. metal pole
Where materials will be purchased:
Home depot, Michael's, Loews, Art Supply Store
I too plan to make my piece look very realistic, but possibly use other colors to give it more of an artistic feel. I want it to correctly portray a ribcage, but have an artsy spin on it. In order to give it that artsy feel, I will be presenting my ribcage as a coat hanger. Not only does muscle and skin hang over your ribs, but your clothes do as well.
Hopefully it works out!!
-Kelsey Hjalmarson
Wednesday, April 14, 2010
Vida Busy Bee Multi-purpose Forearm
I) What am I thinking about and why?
I want to make a double of one of my forearms because they are always taken for granted. Without my forearms, I cannot perform activities such as jewelry making, painting, drawing, cooking, or carrying heavy loads during school days. Although my forearms are not humongous in size, they are extremely useful and are important parts of my body.
The forearm is the portion of my arm between the elbow and the wrist. The forearm is supported by two long bones: the radius and the ulna. Together they form the radioulnar joint. Other important elements are: the arteries, the nerves, the ligaments, the tendons, and the muscles.
About eight years ago, at my job I had to type consistently for seven hours on the computer. In addition, I love making jewelry, and was doing three hours of wire-wrapping every night. I suffered from tendonitis as a result of these repeated motions, and improper use of my left forearm. This injury happens when the forum tendon or muscle is torn. The tear creates swelling and pressure on the tendon, which leads to inflammation and tendonitis.
After six years of serious and painful medical and physical treatments, my forearm finally recovered. I just recently resumed normal activities such as drawing, painting, and jewelry making. I am very thankful to my forearm for its endurance and perseverance, and I promised myself that I will do my daily arm exercise, so my forearm will not get injured again. That is the reason why I want to make a piece based on my left forearm.
II) What materials will be used?
1) 20 gage metal wire.
2) Cardboard.
3) Plaster wrap.
4) Sponge.
5) Fabrics.
6) Duct tapes.
7) Hot glue gun.
8) Regular pliers and long nose pliers.
9) Wire cutter.
10) Marbles.
11) Acrylic paint and Gesso.
12) Paint brushes.
13) Sissors.
14) Sand papers.
III) Where to purchase these materials?
Michael's, Home Depot, Blick Arts Store.
IV) How do I make it?
These are the basic steps:
1) Use metal wire and cardboard to build a skeleton.
2) Cover the armature with sponge and fabrics to get the correct shape of a forearm.
3) Stuff the inside with marbles to attain the appropriate weight of a forearm.
4) Seal the two end securely with duct tape and hot glue gun.
5) Cover the entire piece with plaster wrap.
6) Gesso and sand the surface to create a smooth painting surface.
7) Paint the piece to resemble my own forearm.
IV) What are the functions of this piece?
1) A massager.
2) A baton.
3) A musical instrument.
V) How is it displayed?
It will be displayed in an ice chest with blue ice around it.
Body Double: Spinal Cord

My proposed idea for the body double is to do the spine. Broadly, the skeleton is the structural foundation for the human body. Specifically, the spine is one of the most important structures that allow us to function and perform our everyday tasks. It can easily be overlooked when people compromise this structural element through things such as bad posture.
So within my piece, I want to highlight its importance by externalizing it by sculpture. I plan to emulate its full form and its properties as a protectant of nerves and foundation of human function.
To do this, I plan to model it at the approximate length of my spine.
The materials I plan to use are as follows:
I plan to have it look very realistic in form, but aesthetically pleasing in colors that differ from bone white. I want to almost emulate the artist who did the nose birds (sadly I did not write the name down), since he reproduces the nose in its form, but takes it out of its context through color and juxtaposition of other elements.
I hope for the best! D:
-Jackie Chu
The materials I plan to use are as follows:
- claw hair clips of various sizes (target, CV, or forever21)

- athlete's tape (found)
- masking tape (found)
- paint (some art store)
- adhesive (some art store)
- laptop lock cord (found)

I plan to have it look very realistic in form, but aesthetically pleasing in colors that differ from bone white. I want to almost emulate the artist who did the nose birds (sadly I did not write the name down), since he reproduces the nose in its form, but takes it out of its context through color and juxtaposition of other elements.
I hope for the best! D:
-Jackie Chu
Sunday, April 11, 2010
Subscribe to:
Posts (Atom)